So we are creeping along no wnad it is my OWN fault - YES I am the client who is delaying the ENTIRE project. I havent received my windows or my plumbing for Viola's bathroom yet. I am hoping to have it all be Wednesday so until then we are pretty much ON hold. Which isnt bad because it gives me some time to order so more stuff and basically catch up with the process.
Tilo and I are going to do some more closet layout tomorrow so I know we have all blocking in place to mount all we need to the walls once they are sheet rocked. We are also going to do the porch design which is a bit different to the pictures. I want to add some railing to the left of the front porch to balance that on the right. he and i will discuss with the architect tomorrow. We will pour Monday so I need to make sure we are all on board with this. Last minute decisions that always come about when things have been formed up and aren't quite what you thought! My foundation guy Jason from Dreamscapes will love me!!!
BUT the good thing is we are making the changes now before it is too difficult to change or too costly! Do not hesitate to speak up early on....it will save disappointment and money later on!!
I will post pictures on Sunday..
BEFORE

Our humble abode and the modern tudor it shall become...
Saturday, January 29, 2011
Thursday, January 27, 2011
DAY 13 & 14
Progress is slow because we are waiting on my windows and plumbing fixtures to arrive. The targeted date is next Wednesday. I had my brackets picked up so Ruben and his crew could do my proticos on the sides of the house BUT the brackets were WAY too big! They are monster things. The architect spec'd this size which is standard but it is simply too big for my space. I will re-order the same in a smaller version. They are BEAUTIFUL though. Got them at ProWoodmarket.com model 13t!. here is the link http://www.prowoodmarket.com/products/Wood-Bracket-13T1.html. I have them available for sale if anyone needs a deal on custom made cedar brackets :) ...check them out..

So having no windows and no brackets kind of threw a wrnech into the project schedule as is the deilvery of my bathroom fixtures which was TODAY! I have my Toto toilets!!!
Next weeek should prove more exciting than this - we will do electrical and plumbing rough in and Ruben will be here next Saturday to finish window installs and all the siding and exterior trim. I only have him for a few more days before we start the monster job on Brookridge!!
We got the boards up for the siding and will do battens when the windows are in...

 The front porch footings will be poured this week..footings need to go deeper to support the 3 columns - we got flagged on it today by the inspector. I am HAPPY to make them deeper - I dont want any settling! Rebar has also been bored into the existing brick which many do not do - that is CRUCIAL to keeping it from settling. My brick is still an issue!!! Cant find the right match..may have to go with stone.
My family still thinks it is all cool...Viola and her friend Walden took a tour yesterday - they love Viola's new larger room and have already laid out the floor plan with party corner!!

This is my big stairwell with kneewall that opens up the whole 2nd floor!! I cant wait to see it finished. Tomorrow is clean up day....more later!


So having no windows and no brackets kind of threw a wrnech into the project schedule as is the deilvery of my bathroom fixtures which was TODAY! I have my Toto toilets!!!
Next weeek should prove more exciting than this - we will do electrical and plumbing rough in and Ruben will be here next Saturday to finish window installs and all the siding and exterior trim. I only have him for a few more days before we start the monster job on Brookridge!!
We got the boards up for the siding and will do battens when the windows are in...


My family still thinks it is all cool...Viola and her friend Walden took a tour yesterday - they love Viola's new larger room and have already laid out the floor plan with party corner!!

This is my big stairwell with kneewall that opens up the whole 2nd floor!! I cant wait to see it finished. Tomorrow is clean up day....more later!

Wednesday, January 26, 2011
DAY 13 - Rain, Rain, Go Away...
Not much to show or report toady - it rained all day. I was in panic mode because we have no gutters on the 2nd floor roof line and our basement does have the tendency to leak but even after the down pour at 3 am we have NO water in the basement!! Some one is looking out for us!
I did meet with my insulation guy yesterday, John Schaefbauer, of Better R Insulation. ever meet someone who is so into their "thing" that you just wish you had that much passion? That is John. he is the guru of insulation. He discussed with us almost an hour the benefits of foam, evaluating every nook and cranny in my attic space, telling me how to beef up my framing so we get a sealed home. All of my clients have loved him and he is also working with that Ga Power / SHINE program so his work is "rebate-able". The rebates you get make it almost the same price to do batt or foam!
We have decided to foam the roof line and the exterior walls on the 2nd floor as well as the underside of my porch roof which is under my bathroom floor and we want that warm and dry! I will put in batt insulation between the 1st and 2nd flrs for soundproofing as well as around bathroom walls and between bedrooms. I want peace and quiet in my new space!
I will be ordering the rest of my plumbing fixtures, tubs, attic ladders and int doors this week.
Ruben is here in the rain today to finish up odds and ends inside. I need it to dry up so I can move forward on my front porch!!
Monday, January 24, 2011
DAY 12 - Injury on site....
I thought we would have 2-3 days without an incident on site but no such luck. The lead framer got hurt this afternoon so I drove him to the doctors only to find out they were closed. I hope he made it to an urgent clinic this evening. He got a splinter that was about 1.5 inches long and 1/8 of an inch thick in his ARM - so far under his skin that you couldnt see the end - only the LUMP under his skin that you knew it was in there!
Thank goodness Ruben has worker's comp. Important to check that your GC or framer or whomever has coverage so you are NOT liable!
Anyway, we made some progress inside and outside today. More siding went up as did the overhang, cornice and fascia. Check it out on the small dormer,
 It looks so different compared to the old stucco/batten dormer on the right which will be changed out when the windows arrive.
Inside Machine spent the day adding blocking to the walls. This is CRUCIAL if you want to wall mount TVs, glass walls, or heavier items to any walls. They add horizontal pieces of wood at whatever heights you want so you have something to mount those items to. We blocked everywhere I could think of.
I also did a walk thru with my plumber - Kevin Sutton of KLS Plumbing, to determine the exact locations of the plumbing - the rough in positions to see if we need any additional framing and the final positions of the showerheads, toilets, and what not. KLS is amazing - extremely knowledgeable and VERY hands on. The best is they KNOW these old homes and how to get new plumbing lines through the old framing!
The framing is critical to the plumbers - in these old homes they used 2x8 joists and rafters which by code you can not drill through for plumbing lines. The framer has to come in and add joists to those old ones (called sistering) so the plumbing can be run. Other instances are when you have a big shower valve, which is the inner workings of the shower control inside the wall. I bought Toto fixtures and need more than a walls thickness for clearance so we had to thicken up the wall cavity for the valve by adding a flat 2x4. We figured all of that out today. We also checked the placement of the plumbing vents that have to be run AND how he is going to drop the waste line through my first floor - YES we have to cut plaster and distrub my newly cleaned living space - URGH - more dust and dirt! But I will have Ruben build a plastic wall around that area and encapsulate the dust. Just have to be prepared and it is ALL doable.
So all in all it was a productive day. Plumbing starts Friday and the exterior work continues....
Thank goodness Ruben has worker's comp. Important to check that your GC or framer or whomever has coverage so you are NOT liable!
Anyway, we made some progress inside and outside today. More siding went up as did the overhang, cornice and fascia. Check it out on the small dormer,

Inside Machine spent the day adding blocking to the walls. This is CRUCIAL if you want to wall mount TVs, glass walls, or heavier items to any walls. They add horizontal pieces of wood at whatever heights you want so you have something to mount those items to. We blocked everywhere I could think of.
I also did a walk thru with my plumber - Kevin Sutton of KLS Plumbing, to determine the exact locations of the plumbing - the rough in positions to see if we need any additional framing and the final positions of the showerheads, toilets, and what not. KLS is amazing - extremely knowledgeable and VERY hands on. The best is they KNOW these old homes and how to get new plumbing lines through the old framing!
The framing is critical to the plumbers - in these old homes they used 2x8 joists and rafters which by code you can not drill through for plumbing lines. The framer has to come in and add joists to those old ones (called sistering) so the plumbing can be run. Other instances are when you have a big shower valve, which is the inner workings of the shower control inside the wall. I bought Toto fixtures and need more than a walls thickness for clearance so we had to thicken up the wall cavity for the valve by adding a flat 2x4. We figured all of that out today. We also checked the placement of the plumbing vents that have to be run AND how he is going to drop the waste line through my first floor - YES we have to cut plaster and distrub my newly cleaned living space - URGH - more dust and dirt! But I will have Ruben build a plastic wall around that area and encapsulate the dust. Just have to be prepared and it is ALL doable.
So all in all it was a productive day. Plumbing starts Friday and the exterior work continues....
Before and After
Many have asked about our living arragements after the disaster last Monday....well Viola and I were living pretty bare because my husband was out of town Sunday to Sunday - he was actually skiing in Colorado!! Imagine that, he missed all of the excitement. Anyway, there were things I couldnt move around, blah blah blah so here is how we lived last week....
 Everyone should have 2x4 wood supports in their bathroom! Notice the plywood, this is our way of keeping the plaster ceiling in [lace as they jack hammer out the bathroom floor above it. it has worked so far!
 This is the aftermath of the chicken little episode on Monday. The one sofa is our haven to watch movies - OOOOh did I meniton we have no TV..the satellite had to be removed to do the shingles. Havent had TV in 7 days and counting! It is ALL about being flexible!
 My one clean corner to the left....the rest I will get to this week.
Tilo came home last night and saved us...he got his speaker boxes moved back into place and helped me clean some more areas so we are almost back to normal. I am a bit fearful that something will dirty it up again this week but Tilo is here so it will be easier to handle if it does.
Pictures will be posted as we get the exterior finished. Plumbers are coming out to assess the status and will start on Friday.
Sunday, January 23, 2011
REBATES Gallore!! The down low on getting money to renovate!
There are so many ways to get money back from the government, Ga Power, Watershed Management and environmental groups, that I thought I would try to summarize the how to's on as many as I could. Now I am no expert, and actually learning about all of these as I go, so bare with me if some of the info is not 100% accurate. It is meant to give you a jump start on applying for the rebates. If you find out about any more, please post on this blog and share with the group!
First, the Federal Government Rebates - the Energy Star Program: The last 2 years they had a $1500 tax credit initiative which worked really well. I put in a new HVAC unit and so did many of my clients and we all got a $1500 refund on our taxes at the end of the year. In 2011, the government decided $500 was enough. In order to apply for this you need to make energy efficient improvements to your homes - new energy efficient appliances, HVAC system, windows, insulation. The contractor who does the work for you should provide you with a signed form stating such work was performed and paid for. You will then fill out the tax form described in this link, http://www.energystar.gov/index.cfm?c=tax_credits.tx_index, and away you go. There are also HUGE rebates if you opt to put in solar powered water heaters, fuel cells or some other alternative energy sources in your home. These refunds will be seen as tax refunds at the end of the year. IF you had work done in 2010 and didn't apply, NOW is the time - you would qualify for the $1500 rebate!! Get your contractor to provide you with the appropriate paperwork and file with your tax returns.
Second, the Department of Watershed management rebates: The City of Atlanta rewards you for installing low flow toilets - $50 a pop! Here is the Mayor's info about the program, http://www.atlantaga.gov/media/nr_rebate_012208.aspx, and then the actual rebate How To's, http://www.northgeorgiawater.com/html/392.htm. Seems pretty straight forward..I will let you know how it goes for me.
Third, the Georgia Power Rebate Programs: 1. There is the $525 rebate program for the purchase of an electric Marathon water heater. This water heater costs about $850 for a 50 gal and $1150 for an 85 gal but with that rebate, you are talking peanuts to upgrade. The Marathon is a good unit, all of my clients have installed them and have no issues. The tank itself comes with a lifetime warranty which is an added bonus. Here is the Ga Power link that covers this and the "whole-house rebate" program, http://www.georgiapower.com/residential/home.asp.
2. The 2011 rebates for home improvements from Ga Power changed from the less strict 2010 program. Basically what you need to do is have a BPI certfied energy auditor perform an energy efficiency test on your house. This costs about $450 and takes about 3 hours. Once complete, they will generate a report which tells you were you can make improvements to increase the efficiency of your home. The work that is to be done needs to be done by a BPI certified contractor which is also usually the auditor or he will guide you to the contractors. Once the work is complete, the auditor will retest your house and based on the results of the tests, you will qualify for a certain dollar amount in rebates. The dollar amount goes up as the improvement in overall efficiency goes up. A BUNCH of paperwork is submitted by the contractor and you get an actual CHECK from Ga. Power. You have the potential of getting up to $1900 back with this "whole house" approach when the work is performed by a certified contractor.
If you are only doing a few upgrades, then there as a la carte menu of rebates which can yield you $700 back for work performed by the homeowner, conctractor OR BPI certified contractor. The audit is reimbursed up to $200 so it is almost a no-brainer. I did mine before we broke ground and am hopeful of qualifying for the full $1900. I used Shane Matteson of Energy Conservation Systems for my audit, www.EnergyConservationGA.com who has been holding my hand through this project. My company is currently evaluating a way we can work together with his in order to be able to offer our clients the amazing "whole house" rebates.
The final rebate program out there is the City of Atlanta SHINE Program: This program is in it's pilot phase so it is a bit more complicated to understand and even the contractors are struggling with dechiphering the new 2011 version. Here is the info from the City's website, http://www.atlantaga.gov/mayor/sustainability.aspx as a start. From what I understand, the work has to be performed again by a BPI certified contractor who also is certified for the SHINE program. There are only 11 right now in the city with this certification and Shane is one of them. Again, I am trying to find a way to work with him so our clients reap these amazing benefits. This program pays up to $2000 in rebates for improvements made that increase the overall efficiency of the home. It is like getting paid twice for the work you are doing.
If this isn't motivation enough to improve your home, I don't know what is!! Happy Renovating!
DAY 11 - It's all in the Details
So not much to show with pictures, but a lot of details got taken care of today. The framers are finishing up those details inside - adding blocking to the floor joists in order to keep the "squeaking" of the new hardwoods to a minimum, pulling out all old nails in existing framing (this is key to proper sheetrock installation - have your framer do this because your sheetrock guys will not and that leaves you open to the potential to have "nail pops" which are those weird little buldges you sometimes see in sheetrocked walls over time), leveling up all walls (not just vertically but also horizontally, especially where tile will be installed), and checking all measurements. The also added plywood decking to my new 8ft high attic space for storage. I have never had so much storage, EVER..I think that may be the highlight of the whole project! :)
Outside the continue to put up the board and batten siding. Make sure your guys check for rotted wood, add flashing around windows to keep water out, and use mitered joints where applicable for a cleaner look. We are just waiting on my windows to be delivered so we can finish the exterior work. This is the most important order you will make at the start - windows. They are crucial for the timely completion of any project. If they aren't delivered this week, then Ruben will have to come back AGAIN to not only install them but also to apply the exterior trim and siding around them.
I entered an HGTV show contest to have them send my family on a vacation after all of this is said and done!! Keep your fingers crossed that they pick us because we will NEED it after this...I can't take many more "disasters". I have 2 mor eunknowns that could blow my budget even farther out of the water - plumbing and electrical. Plumbing looks shabby in the existing bath..might need a complete rehall which was not budgeted. And the electrical - WELL in my haste I made the decision to gut my daughter's room so that we would no longer have any plaster walls on teh second floor without much thought to the fact that I may NOW be required to upgrade the electrical work in the ENTIRE home.
When guttign rooms in your older home, keep in mind that most City Inspectors will require you to bring the ENTIRE home up to code if more than 50% is opened up. I may need to get nit picky and calculate my opened wall and ceiling sf so I can fight the City if they tell me this. I might be at 49.975% but that is still under 50% in my book!! I will look at this closer next week when the electrician starts - which by the way I am still evaluating bids on!! There is so much to consider when renovating, make a checklist of things I bring up because they could turn around and bite you if you ignore them!!
Saturday, January 22, 2011
DAY 10 - Outward appearances DO make a difference!
So now my house is getting a major exterior face lift. The guys demo'd my old vinyl lap siding on the rear of the hosue and are installing the tudor style Board and Batten concrete siding. WHAT a difference....
 BEFORE with Vinyl
 AFTER with the new siding style...WOW, right? Just needs the cedar shutters and a little paint.
Now will be the fun changes to see. Adding siding, porticos, the details that make the difference in curb appeal! My front porch will get done this week as well which will bring it all together.
Inside we are still finishing up and fine tuning the designs. Pics to come..
The guys are here today so I will have some more pics later on...
 BEFORE with Vinyl
Now will be the fun changes to see. Adding siding, porticos, the details that make the difference in curb appeal! My front porch will get done this week as well which will bring it all together.
Inside we are still finishing up and fine tuning the designs. Pics to come..
The guys are here today so I will have some more pics later on...
Friday, January 21, 2011
DAY 9 - better late than never!
As you can tell, I took a posting break last night...another foot came through my ceiling and dumped more debris and dust into my now or was somewhat clean living space and I spent th next few hours cleaning it up. I just couldnt muster up enough gumption to post!!
Currtently I have 3 layers of 6 mil plastic on my ceiling in hopes of keeping everything and more importantly EVERYONE out of my living space!! so what I have I learned from this you ask....
1. Site prep, Site prep, Site prep. never underestimate the necessity of plastic, tape and plywood.
2. Plant you and your family in the "safest" rooms in the house (preferably ones not underneath the ones you are renovating!
3. Demand the level of cleanliness from the workers entering you home that you are comfortable with.
4. Treat yourself to a few nights out of the chaos - V and I are headed to a hotel - she can swim and I can sleep through the night without waking up because the house is making noises!
5. Remeber - it will all be worth it in the end because the $8000 you saved on not moving out can be used to pay for your unforeseen change orders!!!
So here is where we are ....all is framed, my floors are braced and blocked, I have a Master "Suite" with a trey ceiling and I have teh most amazing new stairwell that makes me feel like I am walking up to a grand parlor space!! We are starting the exterior work this week - my front porch got demo'd and footings are being dug as I write. Jason from Dreamscapes is doing all of my foundation and Masonry work. he is amazing and is very hands on which takes a lot of perssure off me! he went above and beyond to find my very special brick....meet jason..

And meet the guy who single handidly saved my brain yesterday by taping up my entire ceiling AGAIN for the 3rd time after the foot came through...Poncho, my hero..he truly went above and beyond to keep my sane!

It helps to have a good team out their, who once they figure out your needs, respond accordingly to keep you happy!
And here are the latest pics - it is hard to see the progress made in the pictures. You really need to see it live. The next big change to see visually will be with the insulation and then sheet rock and of course all of the exterior work which will be done this coming week!
 The old guest bath - down to the studs and then some. What we found was lots of old wiring and plumbing - this could be more costly than anticipated to update!!
 No more Front Porch - they are having to salvage each and every brick because my brick is so hard to find now. Jason is out there as well working hard!
 Viola standing in the 2nd flr landing area that will now be opened up with an open hand railing and high ceilings!
 My new stairwell with the 15 ft ceiling height.....dramatic right? For my little house it is the piece de resistance...(french spelling is not so good!)
 The old master which will now become Viola's room. see those diagonal braces in the floor, THOSE are what caused my floors to squeak so loud that I am having to foot the bill for an ENTIRE subfloor/hardwood floor replacement instead of just having the hardwoods refinished! They will now be removed and replaced with horizontal blocking which will keep the squeaking away!
More to come later tonight if there is more to show!
Currtently I have 3 layers of 6 mil plastic on my ceiling in hopes of keeping everything and more importantly EVERYONE out of my living space!! so what I have I learned from this you ask....
1. Site prep, Site prep, Site prep. never underestimate the necessity of plastic, tape and plywood.
2. Plant you and your family in the "safest" rooms in the house (preferably ones not underneath the ones you are renovating!
3. Demand the level of cleanliness from the workers entering you home that you are comfortable with.
4. Treat yourself to a few nights out of the chaos - V and I are headed to a hotel - she can swim and I can sleep through the night without waking up because the house is making noises!
5. Remeber - it will all be worth it in the end because the $8000 you saved on not moving out can be used to pay for your unforeseen change orders!!!
So here is where we are ....all is framed, my floors are braced and blocked, I have a Master "Suite" with a trey ceiling and I have teh most amazing new stairwell that makes me feel like I am walking up to a grand parlor space!! We are starting the exterior work this week - my front porch got demo'd and footings are being dug as I write. Jason from Dreamscapes is doing all of my foundation and Masonry work. he is amazing and is very hands on which takes a lot of perssure off me! he went above and beyond to find my very special brick....meet jason..

And meet the guy who single handidly saved my brain yesterday by taping up my entire ceiling AGAIN for the 3rd time after the foot came through...Poncho, my hero..he truly went above and beyond to keep my sane!

It helps to have a good team out their, who once they figure out your needs, respond accordingly to keep you happy!
And here are the latest pics - it is hard to see the progress made in the pictures. You really need to see it live. The next big change to see visually will be with the insulation and then sheet rock and of course all of the exterior work which will be done this coming week!


More to come later tonight if there is more to show!
Wednesday, January 19, 2011
Insightful thoughts
As we wind down the framing phase, it is time to gear up on the finishes. I need to put some thought into the big picture and what I want from my new space. Some things to answer early on are:
Type of cabinets - are my vanities to hang, sit on feet or have toe kicks. The plumber needs to know this as he roughs in your bathrooms.
Do I want any medicine cabinets, shower/tub niches for shampoo, etc. or extra storage cubbies. Before your framer leaves make sure you have him frame in these features. After he is gone, these changes are harder to make.
Where will my attic access be? You need access especially if your HVAC unit will be in the attic. I am debating on the master closet or hall leading into that closet. I dont have enough space anywhere else for pull down stairs.
Do I want any sky lights? Sky tubes or transom windows. No or never so to speak.
and my electrical plans...you must design your rooms with placement of cable, phone and outlets. I will prepare each room for TV/cable even if only the master will have a TV. the walls are open now so it is an easy cheap addition. Later after the work is complete, these additions will be costly.
I have ALOT of decisions to make this week....
DAY 8 - We r back in business!
The house looks amazing! They have demo'd the guest bath and Viola's room and half of the stairwell. I now have this dramatic stairwell fit for a "palace"! I was going to close it up a bit so I could get more storage in my Master bedroom closet but seeing the stairwell so open I think I have to forgo the extra storage! What do you think....
 I have a 9ft ceiling height in the stairwell - I see 2 beautiful pendant lights hanging in the space...
The rest of the house looks empty and bare - we tore off all of the old plaster and got rid of the old insulation - which by the way was in every inch of my house. Of all the old houses I have opened up like this, mine is the first with insulaiton in ALL walls, interior and exterior and between the floors!!
 Day 8 with the finished roof...front porch will be started tomorrow!!
 Bathroom and Viola's room - all open ready for "newness" of fresh sheet rock and trim!
 The old guest bath, fixtures demo'd making way for the new bathroom...so exciting!
I am starting to see the light at the end of the tunnel and am back to enjoying the process and evolution! Tomorrow they will demo my existing porch and start to work on the new expanded one. We are trying to figure out the design of the front steps with relation to my existing walk way. In real life it is a bit different than what my architect has shown so we need to make some minor adjustments. Typical things that present them selves in renos.
One thing came to light through this "disaster" a few days ago. When we moved all of our items out of the second floor, my home looked soooo completely different than what I thought . As our things were there, I thought we had a good solid house with not many cracks, unevenness or troubles. As I stood in the 2nd floor empty rooms, I saw 1 million cracks, floors that were like waves,and uneven door openings. Seeing this shed some light on client's expectations about the new converted spaces. You remember your original homes as being soooo much nicer than they actually were, so naturally you expect your new spaces to be perfect - beyond perfect, better than the space before. But realistically, we are renovating an old space - it is not new and will never be "new". You are working with what was created 80+ years ago - you can add new Sheetrock, new paint, new trim but really it is still an old frame. If you can keep that in mind, your enjoyment of the new space will be that much more. Unless you tear down and start from scratch, you will need to make friends with the idiosyncrasies of these old homes. Just doing ANY renovation is better than what you started with! We will not get a MODERN home out of this, but ours will be more open, updated and spacious. The ultimate goal from any renovation.

The rest of the house looks empty and bare - we tore off all of the old plaster and got rid of the old insulation - which by the way was in every inch of my house. Of all the old houses I have opened up like this, mine is the first with insulaiton in ALL walls, interior and exterior and between the floors!!


I am starting to see the light at the end of the tunnel and am back to enjoying the process and evolution! Tomorrow they will demo my existing porch and start to work on the new expanded one. We are trying to figure out the design of the front steps with relation to my existing walk way. In real life it is a bit different than what my architect has shown so we need to make some minor adjustments. Typical things that present them selves in renos.
One thing came to light through this "disaster" a few days ago. When we moved all of our items out of the second floor, my home looked soooo completely different than what I thought . As our things were there, I thought we had a good solid house with not many cracks, unevenness or troubles. As I stood in the 2nd floor empty rooms, I saw 1 million cracks, floors that were like waves,and uneven door openings. Seeing this shed some light on client's expectations about the new converted spaces. You remember your original homes as being soooo much nicer than they actually were, so naturally you expect your new spaces to be perfect - beyond perfect, better than the space before. But realistically, we are renovating an old space - it is not new and will never be "new". You are working with what was created 80+ years ago - you can add new Sheetrock, new paint, new trim but really it is still an old frame. If you can keep that in mind, your enjoyment of the new space will be that much more. Unless you tear down and start from scratch, you will need to make friends with the idiosyncrasies of these old homes. Just doing ANY renovation is better than what you started with! We will not get a MODERN home out of this, but ours will be more open, updated and spacious. The ultimate goal from any renovation.
Day 7 - There is a bright side...
After hour sof cleaning and little sleep, I woke up to face a new day with a renewed spirit - especially after seeing my new space upstairs. The room is great, the bathroom with it's vaulted ceiling - just all of the SPACE has lifted my spirits again...Check us out now...in one week's time!
 My Master Bathroom with vaulted single and a transom over the toilet.
 My master Shower with bench nook, 2 shower heads and 2 niches!
 The 9ft trey ceiling in my new master bedroom. Make a HUGE difference.
I cant wait to see what they have done today - DAY 8. The plan was to demo the guest bath, my daughter's plaster walls and the stair well. They will be reframing a higher ceiling in my stairwell to open it up. More to come....


I cant wait to see what they have done today - DAY 8. The plan was to demo the guest bath, my daughter's plaster walls and the stair well. They will be reframing a higher ceiling in my stairwell to open it up. More to come....
Tuesday, January 18, 2011
DAY 7 - Gas is low...
The fellas got a lot done today but I can't say the same for me. I spent the night in newnan to avoid the chaos only to come home to it later after work today. I spent about 5 hours cleaning and only made a small dent in the dust removal from the room. Good news is we have little permanent damage to our furnishings..a few chips off things here and there - just LOTS of dust that does not clean up easily.
There is a bright side - The entire second floor got framed out today - I have a bathroom, shower, closet and trey/vaulted ceilings. It looks great. I will post pictures first thing in the morning. Ruben just put down plywood over the hole below and kept on going! Now is the time I need to decide on medicine cabinets, shower/tub wall niche locations, final wall, built in locations, door sizes, etc. Now the framing I request is included in the price, later after the first attempt and I change something I am opening myself up to upcharges!
Tomorrow they will demo the existing bath which is over the bath I am currentl using. There is a 7:30 am pow wow about setting up the best site protection after yeasterday's fiasco. I am not sure I can take another crashed ceiling. Ruben and I will met to determine the best way to protect my current space.
There are a few things to consider when living in the home during your renovation. You need to set the ground rules for access into the current living space - you need to tell the lead person how you want this to work. Some good ones to follow would be:
1. Have the lead framer/contact call you before they enter your space if you are not home.
2. Have the guys must take their shoes off EVERY time before entering - this did NOT happen today so we will discuss that tomorrow as well!!
3. The interior space where they are working should be protected - floor protection, plastic to keep dust limited to the working area if applicable, items moved out of harms' way, etc.
4. They should make every effort to check the space once they are done working there for debris, nails, whatever doesnt belong needs to be cleaned up.
The extra effort is maybe more than they are used to doing, but a HAPPY client is the BEST client! Don't hesitate to state the rules.
I am truly exhausted at this point - not from the project but from the clean up of this never ending dirt/dust that was the result of yesterday's mishap. This too shall pass. OH did I mention that they shattered a bottom sash of on of the master bedroom windows today?? Ruben just bought himself a new window! That one is on his dollar at least! I can remain calm.....
Monday, January 17, 2011
DAY 6 - SH_T Happens - EVEN to me!!
Remember me telling you how "clever" we were to put plastic up on our living space ceiling to avoid dust and plaster pieces falling on to us and our stuff???? Well, I obvisouly didnt put up enough....
 At approximately 2:45 pm I heard a crack, boom , bam and then came a HUGE puff of dust billowing out of my family room headed towards my kitchen. The ENTIRE ceiling of the family room crashed on top of our living space. And to top it off, I have one of the ONLY homes built in 1920 that has original insulation between the floors - not the nice and tidy batt or foam of today but the puffy million pieced yellow toxic stuff - that is now all over my living space!!!!
Needless to say, there was some screaming, crying, shaking and then a BREAKDOWN. Ruben and the guys jumped into action and as of 7 pm had it all cleaned up, had put plywood on the 2nd floor and put plastic back up so we could live in our space again.It was a SHOCK and a mess....

 Thank goodness the TV survived!! I havent gotten a tally of the damage - will do that tomorrow but I did figure out the issues that led to this and have some tips on how to avoid it:
My existing floor joists of the 2nd floor ran from front to back - about 25+ feet long with no middle support. We had serious cracks in our 1st floor FR ceiling due to the sagging of these joists. Ruben needed to install beams for middle support for the new roof line and to be able to straighten out the floor upstairs so we can lay our bathroom tile without future cracking. Normally you would insert the beams from below but because we were living below, he did it from above. Basically he did it all right - he came on the first floor, built some temporary support walls, cut the joists upstairs, installed the beams from above and reattached the joists to the beams with hangers like we do in new construction. My floor was level and all was good. He removed the temporary supports and then the ceiling cracked. Cracking was expected...but 2 hours later the crack turned into a crash and my ceiling landed on my stuff!!
What can you do to avoid this? If you live in an old house with plaster then have your framer install temporary walls on the main floor when beams are being installed and keep them in place until the project is almost over or until you can determine if the plaster will remain in tact or not. OR better yet, remove the plaster first. Plaster is not bendable, flexible or forgiving. Get rid of it and install sheet rock when it is all said and done!!
Lesson learned - there is nothing a good shop vac, 4 guys and a screaming female can't clean up!! On to day 7 FAST....

Needless to say, there was some screaming, crying, shaking and then a BREAKDOWN. Ruben and the guys jumped into action and as of 7 pm had it all cleaned up, had put plywood on the 2nd floor and put plastic back up so we could live in our space again.It was a SHOCK and a mess....


My existing floor joists of the 2nd floor ran from front to back - about 25+ feet long with no middle support. We had serious cracks in our 1st floor FR ceiling due to the sagging of these joists. Ruben needed to install beams for middle support for the new roof line and to be able to straighten out the floor upstairs so we can lay our bathroom tile without future cracking. Normally you would insert the beams from below but because we were living below, he did it from above. Basically he did it all right - he came on the first floor, built some temporary support walls, cut the joists upstairs, installed the beams from above and reattached the joists to the beams with hangers like we do in new construction. My floor was level and all was good. He removed the temporary supports and then the ceiling cracked. Cracking was expected...but 2 hours later the crack turned into a crash and my ceiling landed on my stuff!!
What can you do to avoid this? If you live in an old house with plaster then have your framer install temporary walls on the main floor when beams are being installed and keep them in place until the project is almost over or until you can determine if the plaster will remain in tact or not. OR better yet, remove the plaster first. Plaster is not bendable, flexible or forgiving. Get rid of it and install sheet rock when it is all said and done!!
Lesson learned - there is nothing a good shop vac, 4 guys and a screaming female can't clean up!! On to day 7 FAST....
Saturday, January 15, 2011
Day 5 - "The roof, the roof, the roof is on.." let's just leave it at that and celebrate!
We are officially dried in. I spent the last 1.5 hours outside with the roofers cleaning up my bushes! I learned pretty quickly in this job, that if I get out and help and "show" them the level of cleanliness I want on the job site, that they will follow suit. Sure enough, as soon as I started crawling around my bushes, so did they! We have a clean site now - free of wood chunks, old shingles, new shingles, nails and trash. I can sleep well tonight!!
Now I am NOT saying that you should be out there doing this, but your lead person should! I am a little anal and NEED to be involved but the rest of you don't. Make sure your project manager is showing the guys what needs to be done and not just relying on them and their definition of "cleanliness"!! You can speak up at ANY time in this process and make sure it is being done they way you want it to be (of course it never hurts to bring the guys fresh backed muffins on a saturday morning when they are working to get what you want!!! :) ).
BUT look at the results we got....In 5 days - from zero to shingled dormer!!


One thing I did learn today is that if you have dish or direct TV and the roofers have to remove the satellite, do NOT let Direct TV put it back on - they simply nail it through the NEW shingles creating ways for water to get in. There is a plate your roofer can by to mount under the shingles and then the satellite attaches to it. The shingles cover it and we are all happy!! a $50 fix but well worth it!
Next week it will be interior demo and framing..Tilo and I will do the layout tomorrow! This is sooo exciting.
DAY 5 - Yes it IS Saturday and we are working!
The roofers are finishing up this afternoon. I will be dried in except for the new windows. I decided to start this renovation 3 weeks early so my windows were NOT ordered on time. They won't be here until Jan. 31st! That is not so nice. It is crucial that once you sign the contract to do the work and the design is finalized, you order your windows. The perfect scenario is to have the windows on site when the framer starts. That way you get dried in that much faster and the project stays on schedule.
Most 2nd story renovations should take no longer than 6 months - a little dormer like mine, no more than 3-3.5 months. Being able to stay in the home is for me a luxury..I dont have to move out and don't have to pay for a move and extra rent. And I am personally able to keep a close eye on my sub contractors. I think they are more conscious of the work they do when they know you are there. That being said, we are only 3 in our family and are living under "cramped quarters"..EUROPEAN style. Check us out...
 This is our Family Room / Sunroom that is now the FR and Master Bedroom. We have quite a view from our bed!!
 This is our old Dining Room that has been converted into Viola's room - she is quite happy in her space and it is closed off by doors, PERFECT!
 This is the other side of the FR looking at the front entry door that they sectioned off. This is great because no contractors will enter our living space without knocking at our side entrance and announcing themselves. That saved me...they have their entrance and we have ours. You can also see the plastic Tilo and I hung up to keep the dust to a minimum in our living space. I highly recommend doing this even if you aren't living in your space - it keeps the "untouched areas" of your home free of that SUPER FINE construction dust that magically appears in every nook and cranny!
Pictures from today to come...
Most 2nd story renovations should take no longer than 6 months - a little dormer like mine, no more than 3-3.5 months. Being able to stay in the home is for me a luxury..I dont have to move out and don't have to pay for a move and extra rent. And I am personally able to keep a close eye on my sub contractors. I think they are more conscious of the work they do when they know you are there. That being said, we are only 3 in our family and are living under "cramped quarters"..EUROPEAN style. Check us out...


Pictures from today to come...
Friday, January 14, 2011
Day 4 - I have a new roof - well 50% at least
They demo'd the entire roof and got the felt down with about 50% of the new shingles. The additional dormer has been framed up and will be shingled tomorrow! Have a look thus far.....


We visited Cofer Bros today to look at Tucker interior doors. We are going all modern and want a flush no panel door - that is next to impossible to find. I would love to bring in doors from Germany!! My house doesnt warrant that for sure...my next house might :) Tilo and I will do interior wall layout this weekend - that is always the trickiest part - make the best use of the space available to you. And will continue getting the plumbing fixtures ordered. I ordered everything for the Master but need to do the 2 other baths now. What a process. Again I will turn to homeclick and national buildersupply sites to help me out.
I am getting tired though and it is only the first week when I had a lot of "no work" time thanks to the weather. Next week will be the test - working 30+ hours, managing Viola's schedule and finishing the first phase of the project!! This blog may become my therapy to stay sane.......
DAY 4 - Meet the crew and other insider stuff
I have talked so much about my "partner in crime" - I thought you should "meet" him. Here is Ruben and his crew.. Raoul and Machine ( not sure about the spelling but that is how it sounds! :)) They have been really great, amazingly fast and accommodating. Again it is crucial you can work together with your lead person!!

Well the roofing crew has arrived. I am getting all new architectural shinlges on not only the new dormer but the entire house. You have 3-tab (least expensive) and many tiers of architectural shingles (25-30-50 year). The architectural give you the longest wear and is standard for my neighborhood. Re-roofing is a very messy undertaking since they have to demo the existing shingles. Make sure all patio and porch furntiture is tucked away and your potted plants are too! Good roofers should use "drop clothes" on which they throw the debris so that site clean up is easy - they wrap up their cloths and take the debris with them.
Also you should tell them to check the plywood decking and notify you of any rotted wood. That should be replaced immediately to avoid leaks and other issues. Some guys move so fast they dont even check! My guys will be here longer than normal, poor things, because they have to first "demo" the layer of ice before ever getting to the shingles! I hope I am not paying extra for that!!
The last issue to check is that they do not use toe boards on top of shingles. This is a way many roofers and especially painters get up and work on the roof. They nail in toe boards to stand at the roof pitches. What that does though is punch holes into your newly installed shingle. That toe board gets removed and you now have a way for water to get into your home! These holes can be plugged with tar but why risk it? Have the guys work with ropes.
I will send photos at the end of the day - really exciting!!!
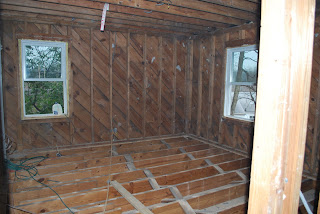
Day 3 - We have a defined space
The walls have been built and now I can actually visualize the space much better. It is always larger than you expect at this phase and then when the sheet rock goes up it is suddenly too small! I feel like I have a bathroom fit for a queen but I know how much it will shrink as we get into the finishes!
 My future "Spa oasis"...
 Viola thinks this is soooo cool! She is big buds with the construction crew!
My skylight in the stairwell idea wont work BUT we will get some additional storage space above the stairwell built in to the master closet which in the 'hood is worth it's weight in gold!
Tomorrow the roof ridge will be set and the shingles will start to go on so we get dried in before the rains hit.
Tilo and I will order our plumbing fixtures tonight - found some GREAT websites to get high end (Toto, Dorn Bracht, Grohe) fixtures at 40% off retail...check out www.efaucet.com and www.homeclick.com and www.nationalbuildersupply.com. AND right now the last site listed has an additional 10% off all Toto products!!! If you need a little more guidance your Project Manager and/or contractor should be able to get you 20% off at Fergueson's or Cowan's.
Still working on my electrical To Do list. While the walls and ceiling are open ALL over my 2nd floor, now is the time to rewire, add fixtures - basically bring my house into the new electrical millennium! This To Do list is a step many do not take enough time on....especially in the early framing stages - go there, visualize your space and "map out" your electrical needs - lights, switches, outlets, speakers, TV/internet. This will save some costly upcharges when you get to the electrical rough in...they place the items and you move them - UPCHARGE! I am so panic'd about this that I dream about lighting placement!!
Thursday, January 13, 2011
DAY 3 - "..Burn Baby Burn" - the snow is FINALLY melting.
Please do not let some freak snow storm move in because we have no roof on the front part of our house!!

We are moving right along - walls are being formed up and the the roof will be framed today. I am about to head up there (I have to go outside to get to my 2nd flr - burrr), take some pictures and lay out the interior walls. This is a crucial step because sometimes the space looks and feels differently once the shell has been framed. The architect has some great ideas, but sometimes the measurements are off (as in my case now) and the space needs to be redefined. Do not hesitate to change things up once the outside walls are in place. This should NOT be an upcharge if you reconfigure the space so long as you do it BEFORE they start building and you are not ADDING a significant amount of linear footage to your walls.
What we found out on my house is that the architect had my new dormer width at 17'-3" and we only have 16'-1" - we have to start from the side wall of an existing dormer and can only go out to the edge of my house...so we are 10" narrower - BUMMER..Ruben has come up with an idea to give me 6" more of width...every inch counts in this area with these old houses. This is an example of an unforeseen where the "as built" measurements are slightly off so you need to have a framer who can get as much back as possible - he needs to be creative and insightful to achieve this!
Another unforeseen - my home was framed with skinny 2x6 joists that went from the front of my house to the back with no support in the middle. No wonder my ceilings on the 1st flr always cracked! So it will cost me an additional $600 in material to add some LVLs (strong composite beams used to carry loads today). Again you have to expect in a renovation of an older home to find things that just could not be seen during the design phase. You can expect to have 5% in change orders generated by unforeseen conditions. If this were new construction, the bill would not be paid by me...but in dealing with a home that is 80+ years old, who could know?? Anyway, I will get a well supported level floor in the Master when all is said and done!
The sun is shining, the snow is melting and my Master is taking shape - this day couldn't get any better!! Pictures will be posted later this evening. Enjoy the last vacation day (I think?). Kris
Wednesday, January 12, 2011
Educational Tid Bits
For those of you following this blog for educational purposes - a few things to do at this phase to minimize intrusion, frustration and chaos:
1. Get to know your lead field person - whether that be the Field Superintendent, Project Manager or Lead Framer. Make them your new BFF. It will be them that will see to it that your vision is created properly. Since I am my own manager, I am relying on my Framer, Ruben to bring my vision to life. He "sees" things like I do and wants to bring out the most in a space - he loves to renovate verses doing all new construction and that makes the difference between getting a great space or an AMAZING one. He had the idea now to make a trey ceiling in my new Master and to vault the new master bath. Both details will add "space" and roominess to the floor plan without ever increasing the actual square footage. Thanks Ruben!
2. Have the subs clean up after themselves. It is key that you set the bar for this - how clean is clean? A day's mess should end up in the dumpster and not on the floor waiting for the next sub to come in and clean it before they can start their work. The guys sweep the trash up at the end of each day and it makes a HUGE difference. it also helps to prevent having coke cans and misc food wrappers end up tucked in your floor joists under the insulation! They add no R value!! :)
3. Don't be afraid to speak up. This is YOUR house and YOUR project and most importantly, YOU are the client. Never lose sight of that - even if this is way out of your league, you still need to check the work and make sure you are getting what you pay for. Who cares if you have NO idea what you are speaking about - all they need to know is the end result you want, so tell them! You will kick yourself in the end if you settle for something because you were to embarrassed to speak up and correct a "professional"!
4. Stay ahead of the project schedule. Make sure your project Coordinator gives you an updated project schedule every week - one that notes when you need to have certain items delivered to the house (fixtures, windows, tile, paint, etc.). If you stay ahead of that schedule, then the last minute decisions that do pop up now and then will not overwhelm you. There are 1 million things to decide during a renovation..live and die by the schedule! If your contractor does not provide this service, look at hiring a coordinator who can generate it for you!!
5. Don't take the chaos too seriously. Realize that 1 million renovations have occurred in the past and each time in the end, the project does come to an ordered end. You will be able to restore your house to proper living conditions - yard and all. Now this comes from an A-Type anal non-chaotic person. It will be my biggest challenge in managing my own project. I have already started to dream of ways to keep the site cleaner! I even went so far as re-taping the site protection just to ensure in my mind that dust will not come in to the 1st floor where we are living....HELLO??? Who does that??
Keep on Building!!
Day 2 comes to a productive end...
We are at 28 degrees right now, and I have a BIG hole in my roof! Thank goodness for Ruben and his handy work that we are still warm down below the 2nd floor war zone!
I have given up the idea that my yard and garden will survive this - I didnt put up much of a fight there..the first layer of saw dust has already killed grass that probably died under the weight of the new snow anyway! Inside we are still in tact - no dust, just noise and "closeness" so far. We can survive this! (My new mantra!)
The extended floor is built....

Great right? I will have a much larger front porch and my Master bath will be above the new porch.
Inside - they tore it all out....have a look...
 This is Viola's old closet which will become our newly extended Master Domain - closet and bath.
 The last little piece of Viola's Kids Room is left above the window...I have to say, for a home that is 80+ years old, it sure held up well!!
Tomorrow Ruben and the guys will frame up the entire dormer and new roof line. Friday it is a new roof for the entire house before the rain comes on Sunday!! My windows have been ordered and I am working on plumbing fixtures as that will be the next thing to do - mechanical rough in (electrical, plumbing and HVAC).
The end of another awesome day!
 Quoting one of my favorite T-Shirt companies right now, "Choosey Chics", "Choose to Build"! Kris
I have given up the idea that my yard and garden will survive this - I didnt put up much of a fight there..the first layer of saw dust has already killed grass that probably died under the weight of the new snow anyway! Inside we are still in tact - no dust, just noise and "closeness" so far. We can survive this! (My new mantra!)
The extended floor is built....
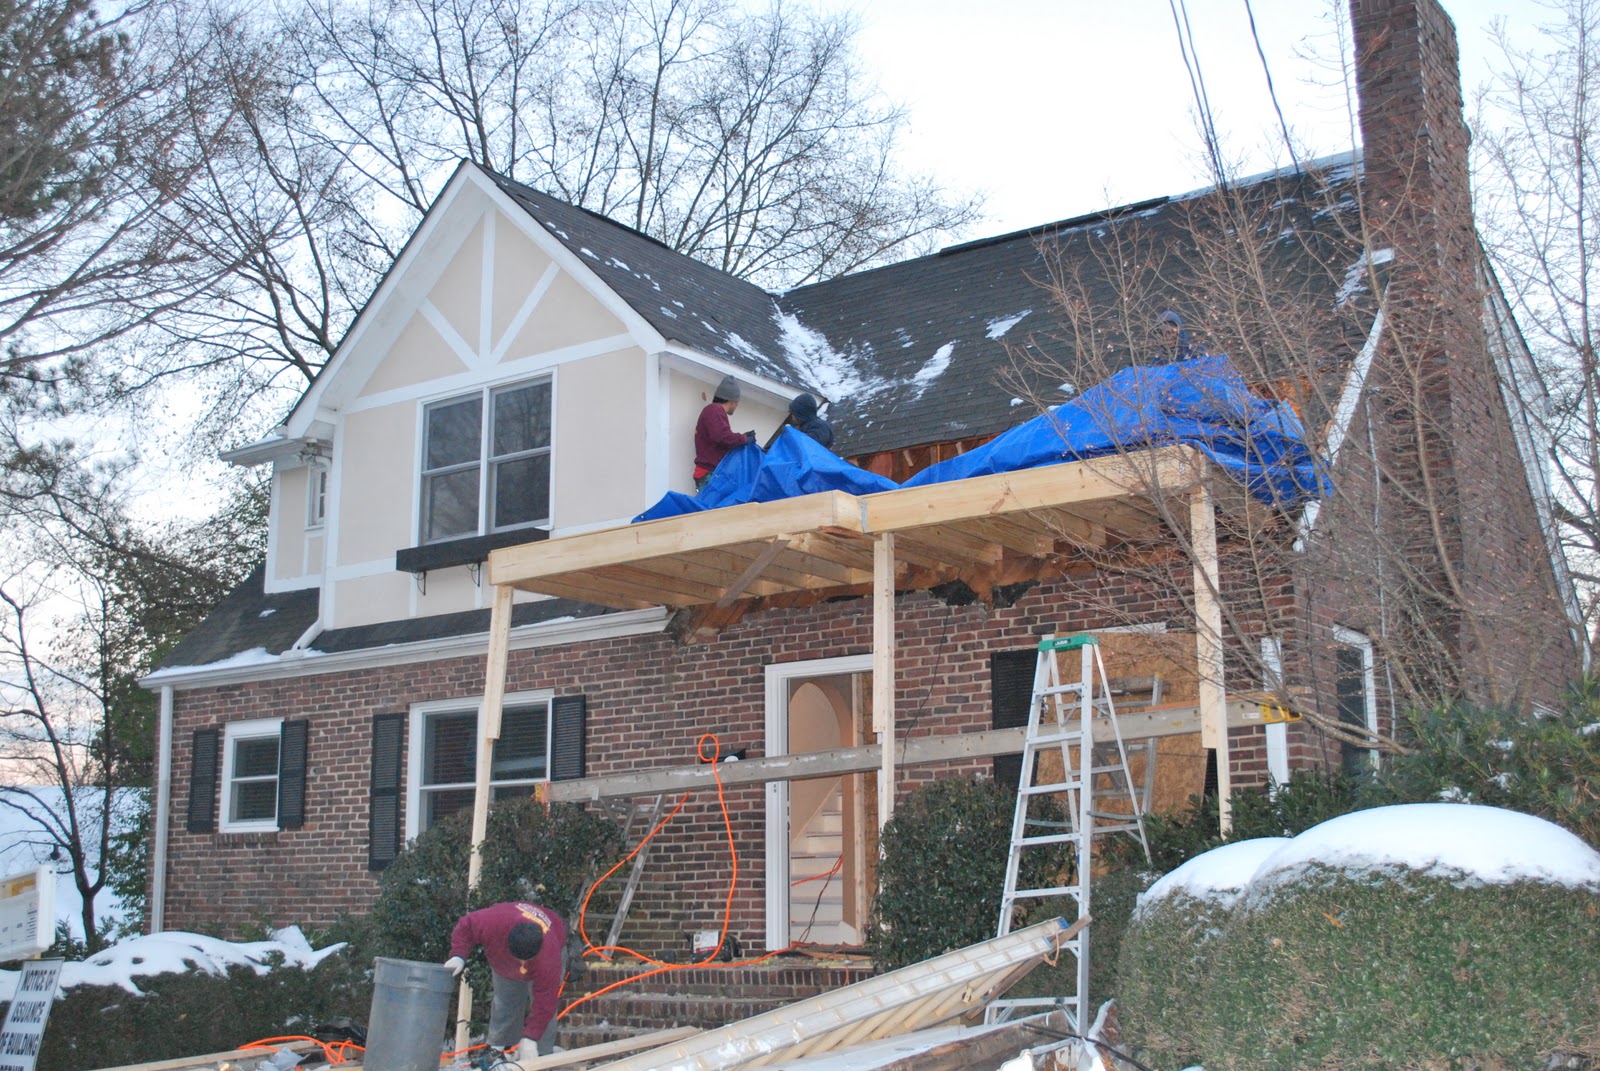
Great right? I will have a much larger front porch and my Master bath will be above the new porch.
Inside - they tore it all out....have a look...


Tomorrow Ruben and the guys will frame up the entire dormer and new roof line. Friday it is a new roof for the entire house before the rain comes on Sunday!! My windows have been ordered and I am working on plumbing fixtures as that will be the next thing to do - mechanical rough in (electrical, plumbing and HVAC).
The end of another awesome day!

DAY 2 - Sunshine!! (Kind of ??)
I wanted to get some before pictures up online before they actually took my roof off - which I think will be tomorrow. The lumber supplier doesn't have trucks out and about yet, so the roof will stay on until there is lumber to build the new one!! Ruben wants to get this framed by the weekend - WOW...
Windows will take 3 weeks so that is a slight problem. Normally you want the windows ordered right after "contract signing" but this is not a conventional project. Ruben will use house wrap to keep the space dried in until the windows arrive. He's my hero!
The boys just got here and are ready to rip out Viola's ceiling, the old Master walls and the front porch portico. I will shoot some pictures now and post those later this evening...In the meantime, here are the before pics....so we have a reference point for our progress...
 This is the old Master that will be gutted to get rid of the plaster and turned into Viola's Oasis.
 This is the current bathroom upstairs - for 3 bedrooms!! It will be gutted tomorrow and Viola will have a new fresh hip modern bathroom in it's place!
 This is Viola's "kid room" - actually more her toddler style, that is now gutted completely and will become the "Love palace" for Tilo and I .... :)
 And this will be my special "added bonus" - we are gutting the stairwell, opening the whole thing up and adding a skylight...
Stay warm out there - it is frozen pizzas for the boys..gotta keep them fed and happy - little "insider secret" when running your own project. The subcontractors tend to be more "sensitive" to your personal belongings when they have plenty of red bull to drink and food every few days!! :)
Windows will take 3 weeks so that is a slight problem. Normally you want the windows ordered right after "contract signing" but this is not a conventional project. Ruben will use house wrap to keep the space dried in until the windows arrive. He's my hero!
The boys just got here and are ready to rip out Viola's ceiling, the old Master walls and the front porch portico. I will shoot some pictures now and post those later this evening...In the meantime, here are the before pics....so we have a reference point for our progress...


Stay warm out there - it is frozen pizzas for the boys..gotta keep them fed and happy - little "insider secret" when running your own project. The subcontractors tend to be more "sensitive" to your personal belongings when they have plenty of red bull to drink and food every few days!! :)
Tuesday, January 11, 2011
DAY 1 - SNOW and DEMO work, an optimal combo!
Okay so this is actually DAY 2 but since my start date was postponned due to the inconvenience of a nsaty snow storm, I had to recalculate.
DAY 1 went great. Ruben, my framer - guardian - and overall site protector - showed up at 8 am sharp with men in tow. It was site protection time. My husband and I, with the idea of Ruben, decided we could save money by living in the home while we renovate! Okay so we only have one child and have lived in Europe for the last 12 years - we can adapt to 1000sf of living space easier than most. The plan is to renovate the 2nd floor first, then move back up and tackle the first floor. I only recommend this for SMALL families with kids 8+ years old!
We have sealed a passage way for the subcontractors to enter my front door and head straight upstairs with no contact with the family on the first floor. For added protection, my husband and I hung 6 mil plastic across the ceilings of the main living space and bathroom to "catch" the pieces of plaster that are BOUND to fall when the begin to demo my 2nd floor. We even have drop plastic cloths to lay over our bed and clothes each day - JUST in case!
Ruben and the boys demo'd my daughter's room which will become the new Master Suite...I think the roof will come off tomorrow or Thursday!
My list of ToDo's - order windows, finalize design decisions and check into interior door prices! Oh and I have to go back to work tomorrow too! We are digging under a house that is sitting on piers!
Pictures to come in tomorrow's post!
Subscribe to:
Posts (Atom)